After having the camshaft sensor replaced in sep 2009, the CCV pipe (no. 2 above) which has to be bent out of the way, started to tear so Crossflags BMW used some tape to hold it together, BUT failed to mention this to me, i only noticed a few months later! Not very professional of them!
It doesnt carry any oil, but is a ventilation pipe, so the worst that will happen is that some oil vapour would be lost and it will idle a little irregular. So i ordered a replacement pipe, the cold cliamte version (11 61 7 533 398) which has foam lagging around it for £20 from Crossflags. Pic below shows old pipe (with tape repair) on top and new lagged pipe below.

In order to replace the pipe the airbox must come out, this is a fairly simple process, with you having to disconnect the MAF. If you are unsure as to how to do this, there's a link to a video by Solid Jake from E46 Fanatics at the end which shows you how this can be done, and also helps familiarise yourself with that area of the engine.

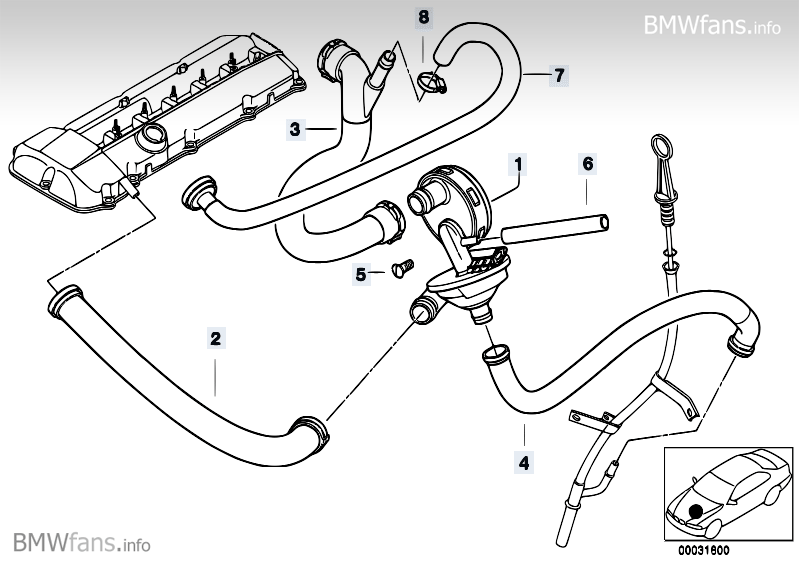
Once the airbox is out above is what things will look like, with the green arrow pointing to the top of the pipe, and the red arrowpointing in the direction of where the lower end of the pipe connects to the oil separator, about another 8 inches in that direction. (Note, not my pic i annotated someone elses)
 It looked fairly simple to replace, but it's actually really fiddly getting your hands down to the lower end of that pipe, where it connects to the oil separator (part no 1 above). I actually had to break the tab on the lower end of the pipe with long screw driver by twisting it, which you can see on the left.
 Once the old pipe is off you must pass the new pipe down the small gap infront of the intake manifold and behind & to the left of oil filter housing (i removed the oil filter to allow better access). This is a little trickier with the cold climate version as the pipe is fatter cause of the foam lagging. The pic on the right shows what i mean, with the 2 red dots showing where the pipe connects to.
 Once I'd passed the pipe down the gap it was the really fiddly & difficult process of connecting the lower end of the pipe on to the oil separator. You can see that some electrical connectors need to be disconnected in order to allow easier access to let you grip the lower end of the pipe properly. The red dot in this pic shows where the pipe must connect to.
If you look at the pic above where i have broken the tab it must be pinched from both sides for it to slide on and for the 2 hooks/tabs to "click" into place. I must admit i only heard 1 click, but that was after trying for a loooooong time! But it can't really move from that position, so I'm pretty sure it will be ok.
Overall this was a real PITA. There is a risk you could break other hoses & pipes coming off the oil separator, so you gotta be gentle. Connecting the lower end of the pipe requires you to pinch and push the pipe on, without inadvertantly applying too much force on to the oil separator & disrupting it & the 3 other pipes that connect on to it. Below is another pic of the old pipe, now with the tape removed so you can see how badly it had torn, close to its upper portion.

Another pic of where the pipe connects on the upper part of the engine:

And lastly a pic with the pipe reinstalled:


DIY Links:
Thanks to Solid Jake whose excellent idle control valve DIY video, shows you how to remove the airbox and more importantly for me, helps in getting you orientated.
The following are helpful DIYs for the oil separator:
http://forum.e46fanatics.com/showthread.php?t=643639&highlight=oil+seperator+diy
http://www.bimmerfest.com/forums/showthread.php?t=323335
http://www.bimmerfest.com/forums/showthread.php?t=417819&highlight=oil+separator