Showing posts with label 330i. Show all posts

Friday, 30 November 2012

Belt Tensioner FAIL! - Importance of Dust Caps - A Lesson Learnt

Been a while since I've posted, been busy and all, but hope to get back into the swing of things ;)  My E46 is now at 120k miles.

Anyway this story was from last October when the car had done about 108k miles, whilst I was on a 450 miles trip from London to Glasgow.  A week or so before my departure I was doing some general checks under the bonnet, and I spotted something unusual with the mechanical belt tensioner which I had replaced about 20k miles earlier.  I was pretty sure that it was meant to have a dust cap, as I could see the torx bolt underneath.  I made a mental note to check realoem, but simply forgot before leaving for Glasgow.

So I was about 300+ miles into my trip on the highway to see the folks, when suddenly I saw the red battery light come on, my mind started to do the math, either it was alternator/battery issue, or it was the first sign of a belt/pulley issue (the other being a heavy steering, but I was driving straight as an arrow on the highway) .  By the time my mind worked through this, perhaps 5 secs, I'd eased off the gas, but then the needle went straight from 12 'o'clock  and into the red.

I pulled over straight away, connected up my bluetooth OBD tool and via a phone app thre coolant temp was reading 126 deg C (normal is 90-96)!!  I opened the bonnet expecting to see a shattered water pump pulley, and torn belt, but instead it was the belt tensioner pulley that had lost its dust cap, had come off instead:


In fact the pulley had come off completely, weeks later I found it still on the engine under tray intact.  But the next few pics will show where the failure occurred.

Initially I thought it was a freak failure, but then by the time the tow truck got me home and I removed what remained of the old tensioner the following day and I got a closer look, I realised what part the missing dust cap played.  Here are pics of the failed tensioner:


Note in the first photo the black discolouration on the body of the tensioner, at the time I presumed this was from the (black) pulley literally disintegrating and exploding into the body of the tensioner.  But like I mentioned, I found it intact on the engine under tray.  I presume the discolouration is release of grease inside the tensioner?

But the most telling picture is the last one, which shows where that circular spring clip snapped.  I presume that with the dust cap missing, water and dirt managed to work there way into the inner mechanism of the tensioner, an over time caused it to fail.

I installed new belts as well as replacing the tensioner.  However the old belt look totally undamaged, but best not to take a chance.  Instead I keep the old belts in the boot, in case of future emergency.  And guess what?  I now keep a spare set of dust caps in my glove box, and any time I open the bonnet to check the oil or fill the windscreen washer, I now have a glance down and check all dust caps are in place!!

On a side note, I was shocked at how quickly the temp needle shot into the red.  Think about it, I wasn't haemorrhaging coolant.  OK, so coolant wasn't flowing around the engine, but it was still in place around the engine.  It would be reasonable to assume that in my case the needle would have gradually increased, but no such luck for us E46ers!

An lastly I was worried about potential cylinder head damage, as the we all know these M54 engines don't take too kindly to overheating.  But I can report, that after a further 15k miles of driving (incl a return trip to Italy), all is well, no coolant use, no white smoke and no yellow sludge in the oil.  I have recently bought a cylinder compression tester anyway, so will check compressions and post back here.  I had a compression check down at about 60k miles, and as far as i can remember, all cylinders were around 160 psi +/- 4

Now we know the M54 engine can handle coolant going up to 126 deg C without warping the head, but that doesn't mean I want it to happen again!!!  I hope this info about dust caps helps out and saves other E46 owners.

Saturday, 21 August 2010

Rear Brake discs & Pad Replacement.

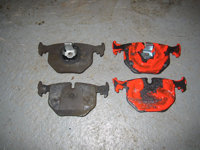
So the warning light flashed up on the dash that meant it was time for new rear pads at ~85,000 miles. I had previously changed the rear pads at approx 50k miles, with Textar ones from GSF. My discs were looking past their best as well, being the original discs, having lasted 85k miles!


I had thought of getting official BMW drilled discs at £80 a piece from BMminiparts , but when i saw Brembo rear discs at £65 for the pair incl P&P on ebay, I thought I'd save myself some cash. And anyway I've already got front grooved discs so, rear drilled discs would look a little odd. I also again got Textar pads (OEM supplier) this time from Eurocarparts for about £20.


The DIY was going well, got the rear left pad & disc done in about an hour, but the rear right was real PITA!! It took over an hour just to get the disc off, which was rusted on and stuck to the cruddy looking handbrake mechanism behind it (see pic to left). In the end i got it off, but in doing so with some needle nose pliers, the handbrake was a little loose after...... no biggie the car was going in for an Oil Service at Crossflags BMW and they readjusted the handbrake at minimal cost.


Hints & Tips
- If you change discs & pads at the same time, they can squeal a for a little while, as they bed in. Mines did, nothing major, just a slight squeal at very low speeds and so I applied some more copper grease to the relevant areas. That only reduced the squeal slightly, but as the discs & pads bedded in over teh following weeks, the squeal has disappeared completlety.

- One tip i learnt from the 1st time i did the rear pads was not to bother with aftermarket "pad wear sensors" from the likes of GSF/Eurocarparts, because the sockets on them are a terrible fit requiring electrical insulation tape to keep them fitted snugly. Instead I ordered original rear brake pad wear sensors from BMminiparts, cheaper than at the dealers, albeit a little more than the el cheapo's from the likes of GSF.

- A rubber mallet will help get your old wheels off if they've rusted on!

- The gap behind the caliper retaining bolts is fairly tight, and when torqueing those bolts back up a 1/4" torque wrench will slip in behind for BOTH bolts & makes the job much easier. Whereas a 1/2" torque wrench will only be able to access the lower of the 2 retaining bolts.

- Also make sure you have plenty of brake cleaner, nothing worse than getting half way through this job and then running out of the stuff. Make sure you clean off all the dirt and crap off guide bolts, the caliper piston etc A wire/stiff brush is handy.

- I used a drill with a rotary wire wheel brush to clean up the hub faces, before applying copper grease to them. Also did the same to the backs of the alloys/rims themselves.

- Use plenty of copper grease (works just as well as anti squeal paste) on the backs of the pads, pic below is from M3 Madrussians website (with excellent DIY write up), of where to apply the grease to the pads. Below is also my pic of the copper grease used on the hub face also, so that the back of the wheel doesnt rust and get stuck on to the hub, hence comes off more easily the next time you wanna remove your wheels.


Wednesday, 9 June 2010

Replacing crankcase ventilation pipe (CCV)


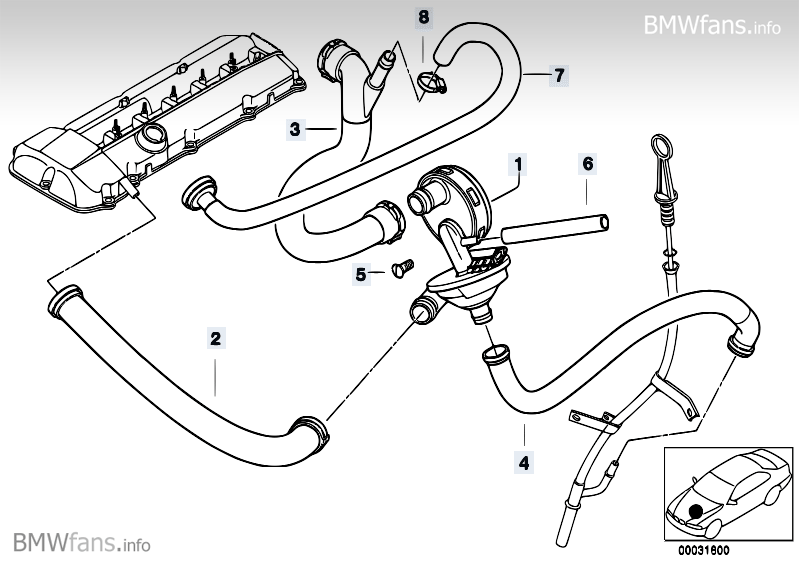
After having the camshaft sensor replaced in sep 2009, the CCV pipe (no. 2 above) which has to be bent out of the way, started to tear so Crossflags BMW used some tape to hold it together, BUT failed to mention this to me, i only noticed a few months later! Not very professional of them!
It doesnt carry any oil, but is a ventilation pipe, so the worst that will happen is that some oil vapour would be lost and it will idle a little irregular. So i ordered a replacement pipe, the cold cliamte version (11 61 7 533 398) which has foam lagging around it for £20 from Crossflags. Pic below shows old pipe (with tape repair) on top and new lagged pipe below.


In order to replace the pipe the airbox must come out, this is a fairly simple process, with you having to disconnect the MAF. If you are unsure as to how to do this, there's a link to a video by Solid Jake from E46 Fanatics at the end which shows you how this can be done, and also helps familiarise yourself with that area of the engine.


Once the airbox is out above is what things will look like, with the green arrow pointing to the top of the pipe, and the red arrowpointing in the direction of where the lower end of the pipe connects to the oil separator, about another 8 inches in that direction. (Note, not my pic i annotated someone elses)


It looked fairly simple to replace, but it's actually really fiddly getting your hands down to the lower end of that pipe, where it connects to the oil separator (part no 1 above). I actually had to break the tab on the lower end of the pipe with long screw driver by twisting it, which you can see on the left.


Once the old pipe is off you must pass the new pipe down the small gap infront of the intake manifold and behind & to the left of oil filter housing (i removed the oil filter to allow better access). This is a little trickier with the cold climate version as the pipe is fatter cause of the foam lagging. The pic on the right shows what i mean, with the 2 red dots showing where the pipe connects to.


Once I'd passed the pipe down the gap it was the really fiddly & difficult process of connecting the lower end of the pipe on to the oil separator. You can see that some electrical connectors need to be disconnected in order to allow easier access to let you grip the lower end of the pipe properly. The red dot in this pic shows where the pipe must connect to.

If you look at the pic above where i have broken the tab it must be pinched from both sides for it to slide on and for the 2 hooks/tabs to "click" into place. I must admit i only heard 1 click, but that was after trying for a loooooong time! But it can't really move from that position, so I'm pretty sure it will be ok.

Overall this was a real PITA. There is a risk you could break other hoses & pipes coming off the oil separator, so you gotta be gentle. Connecting the lower end of the pipe requires you to pinch and push the pipe on, without inadvertantly applying too much force on to the oil separator & disrupting it & the 3 other pipes that connect on to it. Below is another pic of the old pipe, now with the tape removed so you can see how badly it had torn, close to its upper portion.


Another pic of where the pipe connects on the upper part of the engine:


And lastly a pic with the pipe reinstalled:


DIY Links:
Thanks to Solid Jake whose excellent idle control valve DIY video, shows you how to remove the airbox and more importantly for me, helps in getting you orientated.

The following are helpful DIYs for the oil separator:

http://forum.e46fanatics.com/showthread.php?t=643639&highlight=oil+seperator+diy

http://www.bimmerfest.com/forums/showthread.php?t=323335

http://www.bimmerfest.com/forums/showthread.php?t=417819&highlight=oil+separator

Tuesday, 8 June 2010

Bent Steering tie rod

Was driving along at about 40mph at night and didnt spot a massive pot hole, and it was immediatley obvious something was broken in the steering. The car was pulling to the left quite badly, had to keep the steering at the 1'o'clock position.

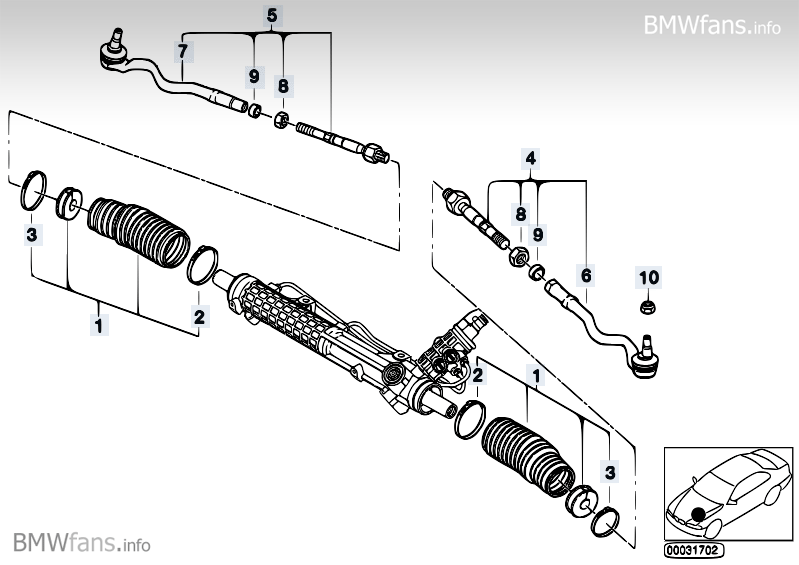
Got home and had a look and the tie rod was bent :( Didnt get to take any photos but it is part no 4/5 drivers side.


I got hold of the part for about £30 from GSF car parts and had to find someone quickly to fit the part and i decided to go to a local garage that had replaced my clutch the previous year. Total parts & labour came to £85, but they werent able to get the steering quite straight, took it back to them, and then it was pulling in the opposite direction!! Claimed thats just how it was! On top of that they scratched the paint work on the drivers side front wing!! By this point i couldnt be bothered arguing with them, and know not to bother going back.

So i ended up having to go to a BMW dealer Crossflags who did a 4 wheel alignment for £135! So much for quoting me £80 excl vat on the phone! Crossflags in Dumfries are actually pretty good, as far as BMW dealers go, but that aint saying much when my they're up against dealers like Harry Fairbairn!! More on the rip off merchants at Fairbairn another time!

Monday, 10 May 2010

WTF!! Where's my Idler / Deflection pulley??

Recently I'd been trying to find the cause of a squeal or whistle from the engine area under gentle acceleration between about 1200-2000 rpm. I had my water pump, thermostat and belts changed about 18 mths ago and noticed the squeal start BEFORE that job was done.

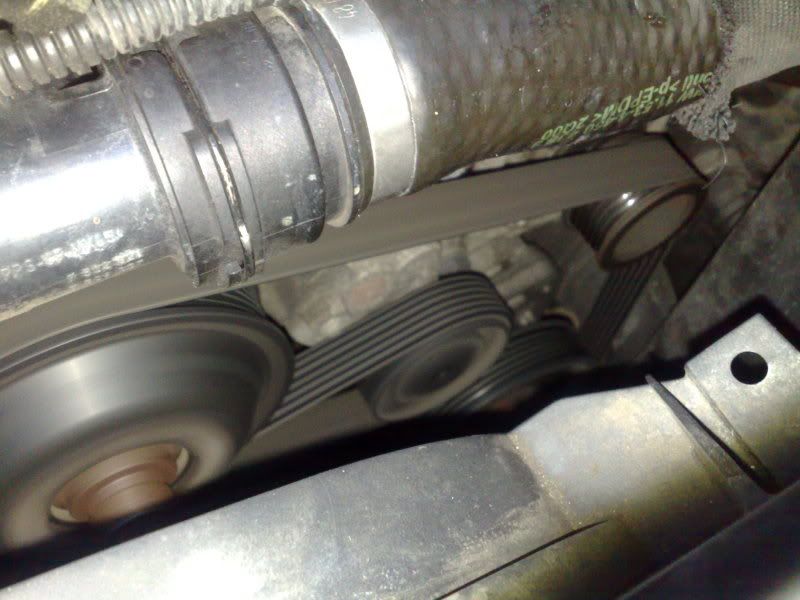
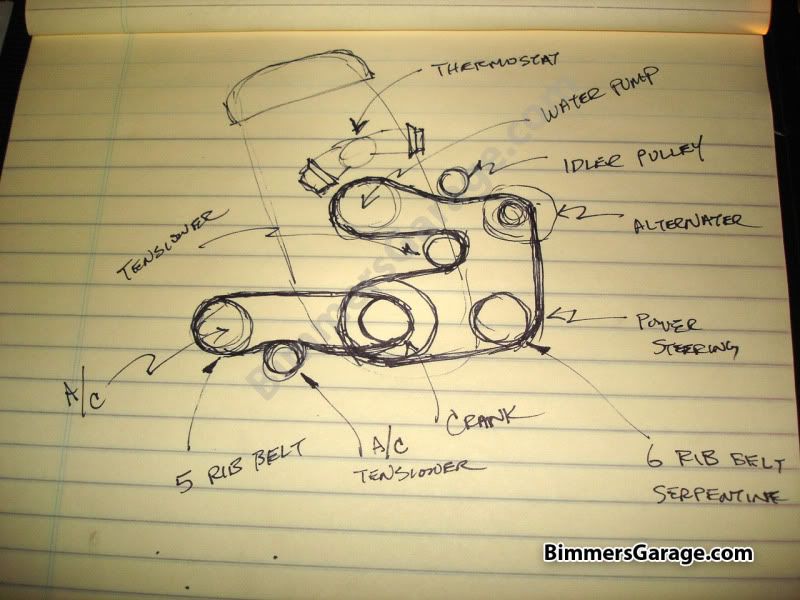
I found some great vids over at bimmer forums, a user called BimmersGarage, which are posted on youtube. Whilst watching the vids i noticed that the arrangement of his pulleys and his drawing were not like mine from what I could remember, so i went out and checked, and sure enough it looks as though my idler pulley is missing!! Was my tensioner pulley taking up the slack???


Below is the schematic diagram by Bimmersgarage showing the lay out of the belt, tensioner and pulleys.


In the 1st video, 10 secs in it very clearly identifies the pulleys, and its pretty clear when you look at the pic of my car that there is NO DEFLECTION PULEY (part no 15 here) I've not noticed any significant ill effects from not having this, but what could be the possible ill effects of this??


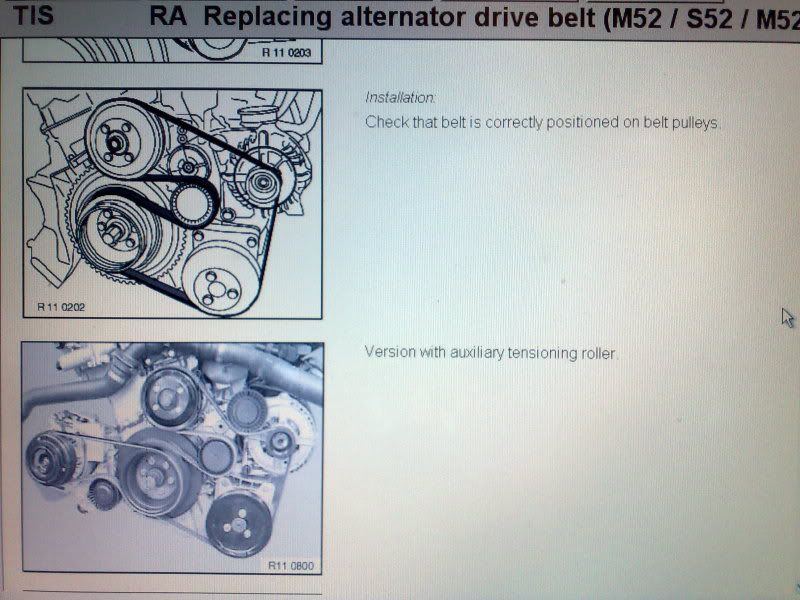
Well I posted this problem up on E46Fanatics, and after people doing some head scratching and digging, the long & short of it is that not all M54/52 engines had the defelction pulley, if this was the case it appears to have been on Euro cars. Below is a pic I took of the TIS manual which clearly shows that not all had the "Auxillary Tensioner Roller" as BMW calls it.


So in the end i could rest easy that my M54 wasnt missing some vital parts. In fact it might even release a few more bhp...... new mod.........deflection pulley delete!!